Most apps don’t fail because of bad code. They fail because nobody wanted them in the first place.
Founders pour months and thousands of rupees into building a product, only to launch to silence. The problem isn’t execution—it’s skipping the step that comes before execution. Learning how to validate an app idea is that step, and it’s the difference between building something people actually pay for and building something impressive that nobody uses.
The good news? You don’t need to write a single line of code to validate your app idea. In fact, no-code tools have brought the cost of validation to near-zero.
Here’s your step-by-step guide to validating your app idea before spending a single rupee.
Why Learning How to Validate an App Idea Matters
Before you spend a single rupee building your app, ask yourself: Do people actually need this?
Research consistently shows that poor product-market fit is the number one reason startups shut down. Nearly 90% of all startups fail. Most don’t fail because founders lack passion or technical skills. They fail because no one actually needed what they built.
Validation isn’t about proving your idea is perfect—it’s about learning whether it’s worth pursuing.
The core principle: Measure action, not opinions. Asking people “would you use this?” is almost always misleading—people are polite, optimistic on your behalf, and bad at predicting their own behavior. Real validation means finding evidence that people have the problem, want a solution, and will pay for yours.
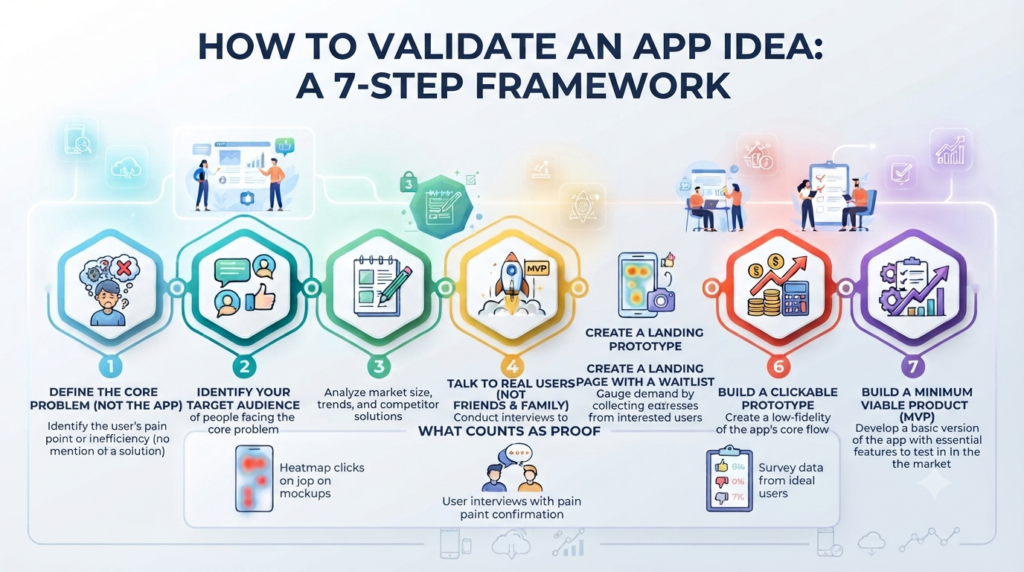
The 7-Step Framework to Validate Your App Idea
Step 1: Define the Core Problem (Not the App)
Before anything else, strip the app out of the equation. What problem are you actually solving?
Start by writing a one-sentence problem statement using this format: “For [who], [problem] causes [impact].”
For example:
- “For small business owners, tracking employee attendance manually causes payroll errors and wasted hours.”
- “For freelance designers, tracking client feedback across email threads causes missed revisions and delayed payments.”
Don’t start with “I want to build an app.” Start with the pain, not the product.
If your software doesn’t solve a problem, it’s just another app collecting dust on an app store shelf.
Step 2: Identify Your Target Audience
No, your software is not for “everyone.” One of the biggest pitfalls is assuming your product has universal appeal.
Instead, define a specific target audience:
- Who will benefit from your software the most?
- What are their pain points?
- Where do they currently find solutions (or fail to find them)?
A well-defined audience gives you a much better chance of building something valuable rather than hoping the masses will stumble upon it and fall in love.

Step 3: Conduct Market Research
Knowing your competitors and market trends will save you from the dreaded “Oops, someone already built this” moment.
Here’s how to research effectively:
Google Trends – See if your idea is trending or old news
Competitor Analysis – Study reviews of similar products to learn what users love (and hate)
App Store Reviews – Read 1-3 star reviews of competitor apps. Look for the same complaint showing up over and over
Quora & Reddit – Discover if your idea is already in demand and what people are asking
When analyzing competitors, you might discover users complaining that “App X is great, but it lacks feature Y”—that’s an opportunity for your idea to shine.
Step 4: Talk to Real Users (Not Friends and Family)
Never rely on just friends or family for feedback. You need to talk to real potential users—people who actually have the problem you’re trying to solve.
Where to find them:
- Online forums and communities
- Reddit (subreddits specific to your niche)
- Facebook groups with your target profile
- Cold emails to potential users
How to conduct interviews:
- Keep it to 15-20 minutes
- Your job is to listen, not to pitch
- Ask open-ended questions that get them talking about how they handle things today
- “Walk me through how you handle this today.” (This shows you their current workaround—and a workaround is a strong signal that the problem is annoying enough that someone’s already spending effort on it.)
- “What have you already tried?” (This surfaces existing competitors and shows what’s fallen short.)
Your goal is to validate the app with users, not with your assumptions.
Step 5: Create a Landing Page with a Waitlist
A proven pre-MVP validation tactic is to create a simple landing page that pitches your app concept and invites people to “Join the waitlist” or sign up for updates.
What to include:
- A clear description of the problem you’re solving
- How your app solves it
- A signup form for early access or waitlist
What counts as proof:
- Email signups for a waitlist
- Pre-orders or signups for early access
Even major startups like Dropbox used this method to validate demand before building.
You can build a landing page in minutes using free tools like Carrd, Webflow, or even a simple Google Form embedded on a free website.
Step 6: Build a Clickable Prototype
Design clickable prototypes showing how your app would operate before full development.
Tools you can use for free:
- Figma – Mockups, UI/UX testing, prototype flows
- Miro – Go from concept to clickable flow in minutes
Then put that prototype in front of real users. Watch how they interact with it. What do they click? What confuses them? What do they ignore?
What counts as proof:
- Heatmap clicks on mockups
- User interviews with pain point confirmation
- Survey data from ideal users
Step 7: Build a Minimum Viable Product (MVP)
Not a perfect one. Perfectionism is the enemy of progress.
An MVP should be simple, functional, and able to solve the primary pain point your users have. It should do one thing really well—solve the core pain point.
Examples of MVPs:
- A simple landing page with a waitlist
- A basic web app with core features
- A prototype or mockup that users can interact with
The right order: Validate first, then build an MVP. Many founders skip straight to building—often because it feels more productive—and end up creating something polished that solves a problem nobody cares about enough to pay for.
Set a 2-4 week build timeline and identify 10-20 target users for early feedback.
The Most Important Question: Will They Pay?
Love is nice, but money is better. If people aren’t willing to pay for your software, it’s not a business—it’s a hobby.
Test willingness to pay:
- Pre-sales – Offer early-bird pricing for those who sign up before launch
- Crowdfunding – Platforms like Kickstarter help validate demand
- Freemium with paid features – See if users will upgrade for premium features
If people hesitate to pull out their wallets, rethink your pricing, business model, or even the problem you’re solving.
What ‘Proof’ Looks Like (Before You Build)
Not sure what counts as real validation? Here are the signals to chase:
✅ Email signups for a waitlist
✅ User interviews with pain point confirmation
✅ Heatmap clicks on mockups
✅ Survey data from ideal users
✅ Pre-orders or signups for early access
✅ People actively searching for solutions to the problem
The Bottom Line
You don’t need code. You don’t need a product. You don’t even need a developer. What you need is proof.
Learning how to validate an app idea isn’t about being perfect. It’s about being right enough to build.
The best founders today are validating in public, moving fast, and building with confidence—because they know the demand is there.
Stop waiting. Start testing.
Need help learning how to validate an app idea? At Aarvia Apps, we help founders turn validated ideas into successful mobile applications. Contact us for a free consultation.
Quick Checklist: Validate Your App Idea in 30 Days
| Week | Task |
|---|---|
| Week 1 | Define the problem. Identify your target audience. Write your problem statement. |
| Week 2 | Conduct market research. Analyze competitors. Read app store reviews. |
| Week 3 | Interview 10-20 potential users. Create a landing page with a waitlist. |
| Week 4 | Build a clickable prototype. Test with users. Evaluate: Do you have proof of demand? |